2010-03-30

Anti-smoking Smokey eyes

Hello!

Today I'm gonna do a quick and simple smokey eye with a tutorial.
You can use only SkunkLook eyeshadow, Astral Shine eye stain and mascara or SkunkLook, highlighter, black eyeshadow and Astral  Shine eye stain and mascara.

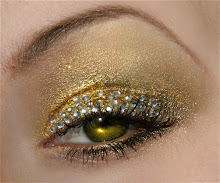
Here's the final look (with more products):


What you need for this look:

Skin:
Face Canvas
Easy stick Almond
Baked Mineral Foundation Light
Shading Powder
Hilighter Powder


SkunkMiracle

Brows:
Brow Powder Dark Blonde

Eyes:
Eyeshadow Base
SkunkLook eyeshadow
Black Beauty
Mineral Black eyeshadow (sold out)
(SkunkMiracle)
White Gold eyeshadow
Astral Shine eye stain
SkunkLash mascara

Lips:
Powder
SkunkKiss

And the look with just SkunkLook:

And here's how you achieve them:

Start with priming your eye with MSCHIC EYESHADOW BASE:

Then add SkunkLook eyeshadow to whole lid, and to lower lashline:

Then line your upperlahline and waterline with Astral Shine eye stain:

Then add SkunkMiracle to you highlight, use it to blend the eyeshadow better:

Then finally add mascara, and you have a super easy smokey eye!

I decided to make it a bit more intense, and I used my Tres Chic Look Book to transform it to this:

Basicly it has three easy steps.
1. Add black eyeshadow ( I used Black Beauty and Mineral Black) to outer part of the lid, and as shown in the pic.
2. Then add light eyeshadow (I used White Gold) to highlight and in the middle of the lid, to bring more depth:

And then it's supposed to look like this:

And you know what the best part is? I think it goes with any eyecolor:


But that's all this time, I see you next week!


Love,


2010-03-23

Shapeshifters in the shadows

Hola everyone!

I hope you've had a nice week!

Spring is still trying to find it's way to here in Finland, apparently it got lost  somewhere and all we have now is more snow :/

But enough about the weather, you're not here to read about that, right?

You're here to read about the MAKEUP.

This time it's about lights and shadows.

So we all know that face isn't flat. And if you apply a layer of opaque paint (ie. foundation, powder, what ever) it loses part of it's natural shine, and that makes your skin look flat.

So after we have painted our faces to cover, we need to make them look natural again. (Men, if you are reading this and shaking your head 'cos it makes no sense, stop it. We don't think it makes sense either, but we do it anyway. Just like what you guys do with your cars :3 )

But HOW do we make our skin look natural then?

We need Shading Powder, Highlighter and Blush.

Personally the most important thing in makeup is to take notice on higher and lower points.
darkest color goes to deepest point, lightest to the highest. It works on lids, cheeks, even lips.

But how do I do my contouring?

I do it like this:


And here's pics showing the process.

First here is flat skin with just primer, easystick and minaral foundation:

Then I added shading powder just under the cheekbone. Easiest way is to make a "fishface", so you see where your cheekbone is. I also added shading powder to define my chin line, and a hint to temples:

Then I used the highlighter. Well, actually I sometimes use blush first, but I don't think that matters so much :3
Anyway. What are the highest points of face? Cheekbones, nose, chin, forehead, and (IMO) cupid's bow (also brow bone, but I usually add eyeshadow to highlight it) . So I add highlighter to those points:

Well, the last pic doesn't really show the blush, but there it is, trust me. Easiest way to determine where to put blush is to smile, it should show you the right spot. Then add blush to your cheek.
Finally, if you think the lines are too harsh, you can soften them with kabuki brush.

But that's all this time. Hopefully I'll get to tell you about the MSCHIC's new spring collection next week!

Have a great time!


Love,

2010-03-16

Come spring (or high water)

Hello again!

Finally the sun starts to shine more here in Finland, snow starts to melt away, and it feels that maybe the spring is coming after all.

This week's blogpost is about using few waterproof products.

We all hate when it's raining/snowing, and your makeup ends up on your cheeks, right?

So if you KNOW you will get wet, and you still want to do a quick and simple waterproof makeup with only a couple of products, this one is for you:

All you need is these:


No powder eyeshadows, no base's, just mascara, eyeliner and cream eyeshadow!

So first you add  Soft Ice Vanilla Eyes Cream to your whole lid. It's waterproof, and really pretty golden vanilla shade that suits almost anyone:


Then the eyeliner, personally I love Black Cherry Shine Eye Stain. This time you don't use it like you normally would use eyeliner, you use it as an eyeshadow. Thickest layer goes to the outer corner, and from there it fades upwards and towards the inner corner. Remember to also use it as a liner :D

Final step, adding the mascara. MSCHIC 3D mascara is weather proof, so you can't go swimming with it, but it will last some extreme weather conditions :D

So here's the final result:
I added a hint of Black Cherry Shine eye stain to lower lashline's outer part.


OMG, then it starts raining! There's water everywhere, so what will happen to my makeup now?

Oh, nothing, it looks just the same as before water!

Wohoo, day saved!

So let there come snow, rain, frogs or even little stones, my makeup can take it!
(not sure I can take it though :D)


But anyway, that's all this week. Let's see what I come up with next week!

Is there anything you would like to know about MSCHIC products? Any specific color combinations, products, anything? Let me know, either by leaving a comment or sending me mail!

Love,

2010-03-09

Skintastic!

Hello again sweeties!

I hope you all have had a wonderful week!

Today I'm not gonna post a full look for you, but I'm gonna tell you something about my absolutely favourite MSCHIC products. 

I've always been an eye makeup fan. I love especially eyeshadows, I always use eyeliner, glitters are fun, mascara is very important etc. You get the point.

Before I wasn't interested in skin makeup at all. I somehow thought that if the eyes are done, anything else doesn't matter. First I used only powder, then a combination of liquid foundation and powder. No primer, no shader, no highlighter, no blush, no nothing.

How wrong was I.

Then at some point I fell in love with skin products. Now that I've tried certain MSCHIC products, I'll never want to use anything else.

Here are my favourites, I won't do a look without these babies:


So why are they so good? 

Because they do miracles to my skin. 
And because a picture will tell you more than a thousand words, I'll show you some before-and-after images.

How do you turn a skin like this:


To a skin like this?

With MSCHIC products.

See how:

First there's my skin with just moisturizer:
  
Believe me, you DON'T want to enlarge the pic. I know I have bad skin.

Then we add MSCHIC's Face Canvas primer:
  
 You can see how it actually makes the skin look smoother and matte.

Then I apply a small amount of MSCHIC Easy Stick:
  

And here's the result with Easy Stick:
Nice, but not enough for me!

 So I take my MSCHIC Baked Mineral Foundation, my kabuki brush, and voilá:
 
I know I still have a dry spot, and that I still have bumps, but hey - nobody's perfect :D
(and yes, I usually darken the "beauty spot", and I don't leave it looking like that, but I thought it shows the coverage of the foundation well.)

So what to do with shader, blush and highlighter then?
Skin isn't flat surface. You need to get DEPTH to it.
You shade the lower points and highlight the higher points. Blush brings more life to your whole look. 

Here's how much shader, blush and highlighter change the look:

Without them skin is just FLAT:


But when you add shader to the deepest part, highlighter in the highest part, and blush:
 

So that's it this time, I hope this was useful!

See you again next week!
Love, 


2010-03-02

Prince on a purple stallion

Hello everyone!

Again I hope you all have had a great week!


Today I'm not only gonna give you a MSCHIC look, I'm also gonna give you a step-by-step tutorial how to make it!

The look is dark and sultry, perfect for a night out!

Here's the look:


And then the tutorial! List of used products in the end of the post.

First do your makeup base and brows:
 

Then add MSCHIC eyeshadow base to whole lid:
  

Then add MSCHIC Prince eyeshadow to your whole lid (I used MSCHIC's 624 brush):
  

Then blend Mineral Black eyeshadow to outer corner of lid and crease, blend upwards to brow from inner corner. For blending I used MSCHIC 656 brush:
  

Then more blending, this time with MSCHIC Prince. Use it to blend the black shadow better:
  

Then the highlight. I used MSCHIC's White Gold eyeshadow to highlight and inner corner:
  

Mineral black to your lower lashline:
  

Blend it in with Prince:
  

 MSCHIC's Sumi'e eye stain to upper lashline and to waterline:
 

Then add mascara (I used MSCHIC's 3D mascara), and the look is done!


I then added some falsies and purple wig:


Skin:
Face Canvas
Mineral Consealer Light
Easy stick Almond
Baked Mineral Foundation Light
Shading Powder
Hilighter Powder

Brows:
Brow Powder Dark Blonde

Eyes:
Eyeshadow Base
Prince eyeshadow
Mineral Black eyeshadow (apparantly it's sold out, but you can easily use for example Black Beauty )
White Gold eyeshadow
Sumi-e Eye Stain
3D Mascara

Lips:
Eyeshadow Base
Lipchic Bella
SkunkKiss

I just loooove purple!

What is your favourite eyeshadow color to wear?


Anyway, I wish you a good week, and I hope I managed to inspire you to use your makeup differently!


Love,